


 Click here for PDF version and patterns
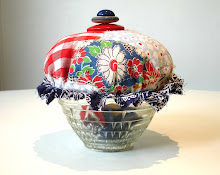
These pretty ballet slippers -- a most enjoyable and fun sewing project -- can be made in a leisurely afternoon. Rummage through your left over fabric scraps and notions, get started and before you know it, you will be admiring your handiwork as you pad around in your cozy new slippers.

What you need …
**unless the yardage is noted, lay your patterns on the material to determine the yardage
• Re-cycled denim
• Cotton fabric (pink gingham) for lining
• Cotton fabric (eggplant floral print) for piping, heel trim and ruffles
• 24” x 5/8” wide velvet (raspberry) ribbon, cut in half
• Iron on interfacing
• Cardboard
• Leather, vinyl, denim or another durable material, for the sole
• 1 yard x ¼” wide elastic, cut in half
• Thread, scissors, pins, pencil, needles, sewing machine
• PDF (click here) upper, sole and ruffle patterns
Check the fit before you start …
The pattern included is an adult, medium size. To check the fit, stand on the sole pattern. It should peek out around the perimeter of your foot. If you need to reduce or enlarge the pattern, cut the pattern in quarters down the middle, and then extend, or overlap the pieces to fit your foot. Tape together, smooth out the new lines, and apply the changes also to the upper pattern. Then cut an upper and sole out of some leftover fabric, gather the toe and baste the two pieces together. Slip it on, check the fit, and apply any further adjustments to your pattern pieces.
• Cut the floral accent fabric: Cut two bias strips 1” x 24” wide from the floral print for the piping + 4 x half-moon pattern for the ruffle + 2 strips 1 ½” wide x 3” long for the heel trim.
• Transfer all pattern notches.
• Cut two cardboard soles (cutting 3/8” smaller all around the perimeter of the Sole
Pattern. (If you like your slippers more cushiony cut out a pair of foam liners as well.)
Easy to follow sewing instructions…
Denim Upper and Sole:
Iron the interfacing on the back side of the denim uppers and soles.
Sew a row of basting stitches between the toe notches. Stitch the heel together with a 3/8” seam allowance and press open.
Reinforce the heel seam with the cotton floral fabric as follows: Interface 3” strip floral accent fabric. Fold back ¼” seam allowance along each length and press. With wrong sides facing each other, center strip over the heel seam. Pin and trim any excess off the top and bottom so strip aligns with denim edge. Edge stitch along each length. Pull the toe basting thread, easing gathers, so that the toe will curl under softly. With right sides facing, pin the upper to the sole, matching notches. Baste and remove pins. Stitch seam with 3/8” seam allowance. It is a wee bit tricky, so take your time to stitch a neat, curved line, with toe gathers evenly distributed.
  Turn right side out. With something firm, like a pair of blunt scissors, press firmly on the seam, to give it a pressed finish.
Make Lining:
Iron interfacing to the cotton lining upper and sole.
Following above instructions for the denim, stitch the lining upper to the sole.
Assemble Slipper:
Slip cardboard soles inside slippers.
*If you like your slippers cushiony then slip the foam soles on top of the cardboard.
Slip the linings inside the slippers, smoothing neatly in place. Pin.
Baste together all around the perimeter of the edge.
Trim off any lining that extends beyond denim.
Make the Ruffle:
With wrong sides facing, stitch one pair of ruffles together, sewing ¼” around the half circle shape but not the bottom.
Turn ruffle inside out and press.
Stitch a row of basting stitches ¼”, along the bottom edge. Pull the basting stitches to form soft gathers.
Pin ruffle, centered, aligned with denim edge, to slipper front. Baste and remove pins.
Add Slipper Piping and Elastic:
With right sides facing each other and edges aligned, pin the bias floral fabric all around the perimeter of the slipper edge. Baste, remove pins. Stitch ¼” around the edge.
Zigzag stitch the elastic around the slipper edge as follows: Align the elastic with the slipper edge on the inside, pinning it all around with a little ease. (You only need a little elastic ease for a good fit.) Zigzag stitch down elastic center.
Press the floral bias piping up. Fold it over the edge, and tuck the seam allowance under. Pin it around the perimeter so that you have a neat piped edge.
Hand stitch the piping closed, with the stitching line following the seam join point on the right side, so that your stitches are hidden. Be careful to pull the elastic as you stitch, to maintain the ease.
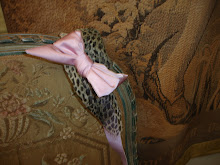
Velvet Ribbon Bows:
Tightly tie two small bows. Cut bow ends at diagonal angle.
Hand tack bows to cover the join point of the ruffle.
Pad around with a big smile and enjoy!

The pattern included is an adult, medium size. To check the fit, stand on the sole pattern. It should peek out around the perimeter of your foot. If you need to reduce or enlarge the pattern, cut the pattern in quarters down the middle, and then extend, or overlap the pieces to fit your foot. Tape together, smooth out the new lines, and apply the changes also to the upper pattern. Then cut an upper and sole out of some leftover fabric, gather the toe and baste the two pieces together. Slip it on, check the fit, and apply any further adjustments to your pattern pieces.
Cut your pieces …
• Cut two denim uppers + two upper interfacings.
• Cut two soles from the durable material.
• For the lining, cut two soles and two uppers out of the pink gingham + two sole and two upper interfacings.• Cut two denim uppers + two upper interfacings.
• Cut two soles from the durable material.
• Cut the floral accent fabric: Cut two bias strips 1” x 24” wide from the floral print for the piping + 4 x half-moon pattern for the ruffle + 2 strips 1 ½” wide x 3” long for the heel trim.
• Transfer all pattern notches.
• Cut two cardboard soles (cutting 3/8” smaller all around the perimeter of the Sole
Pattern. (If you like your slippers more cushiony cut out a pair of foam liners as well.)
Easy to follow sewing instructions…
Denim Upper and Sole:
Iron the interfacing on the back side of the denim uppers and soles.
Sew a row of basting stitches between the toe notches.
Stitch the heel together with a 3/8” seam allowance and press open.Reinforce the heel seam with the cotton floral fabric as follows: Interface 3” strip floral accent fabric. Fold back ¼” seam allowance along each length and press. With wrong sides facing each other, center strip over the heel seam. Pin and trim any excess off the top and bottom so strip aligns with denim edge. Edge stitch along each length.
Pull the toe basting thread, easing gathers, so that the toe will curl under softly. With right sides facing, pin the upper to the sole, matching notches. Baste and remove pins. Stitch seam with 3/8” seam allowance. It is a wee bit tricky, so take your time to stitch a neat, curved line, with toe gathers evenly distributed. Turn right side out. With something firm, like a pair of blunt scissors, press firmly on the seam, to give it a pressed finish.Make Lining:
Iron interfacing to the cotton lining upper and sole.
Following above instructions for the denim, stitch the lining upper to the sole.
Assemble Slipper:
Slip cardboard soles inside slippers.
*If you like your slippers cushiony then slip the foam soles on top of the cardboard.
Slip the linings inside the slippers, smoothing neatly in place. Pin.
Baste together all around the perimeter of the edge.
Trim off any lining that extends beyond denim.
Make the Ruffle:
With wrong sides facing, stitch one pair of ruffles together, sewing ¼” around the half circle shape but not the bottom.
Turn ruffle inside out and press.
Stitch a row of basting stitches ¼”, along the bottom edge. Pull the basting stitches to form soft gathers.
Pin ruffle, centered, aligned with denim edge, to slipper front. Baste and remove pins.
Add Slipper Piping and Elastic:
With right sides facing each other and edges aligned, pin the bias floral fabric all around the perimeter of the slipper edge. Baste, remove pins. Stitch ¼” around the edge.
Zigzag stitch the elastic around the slipper edge as follows: Align the elastic with the slipper edge on the inside, pinning it all around with a little ease. (You only need a little elastic ease for a good fit.) Zigzag stitch down elastic center.
Press the floral bias piping up. Fold it over the edge, and tuck the seam allowance under. Pin it around the perimeter so that you have a neat piped edge.
Hand stitch the piping closed, with the stitching line following the seam join point on the right side, so that your stitches are hidden. Be careful to pull the elastic as you stitch, to maintain the ease.
Velvet Ribbon Bows:
Tightly tie two small bows. Cut bow ends at diagonal angle.
Hand tack bows to cover the join point of the ruffle.
Pad around with a big smile and enjoy!

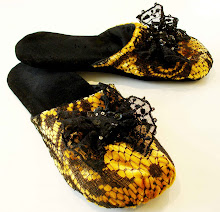
 These bonnets take an hour maximum to make, and are so practical and fun - and decorative and cheery in the bathroom. This is how you sew them...

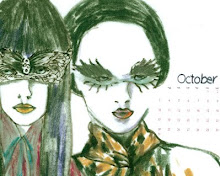
 Click here to download or print your free February screensaver)

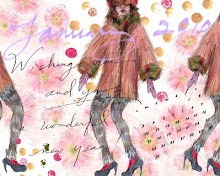
 Carine Roitfeld
  (click here to download the January screensaver)
 ... and that delicious red color, meant it was time to wear the old patched (it's in my book!) ski sweater, that my Mom had knit so very long ago, layer it over a couple of t- shirts (one was not enough,) leggings under overly patched jeans, and finally a pair of hand knit RL argyle socks were stretched on top of the jeans to keep the warmth inside. Feeling wrapped and bundled up, felt cozy and protected on a bitter winter day, especially, when

 The men are equally turned out, with immaculately tailored and fitted tuxedos – here as with the women, the beauty is in the perfection, the fit, the way the clothes glide effortlessly, move so easily, it their charm, and that sort of made-to-order feeling is a luxury not seen today.
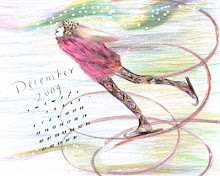
 (click here to download this month's fashion calender)

 Spring 2011 collections started in New York, continued to London, are happening right now in Milan and soon will, en wrap Paris. Via the inventiveness of the Internet, there is much for everyone to see and learn about the collections, the designers, the fashion shows and the behind the scenes creative talents who make these presentations so sumptuously remarkable and influential. Once those "talents" and their techniques were privy to a select group of fashion editors and key store buyers, but today you can whip around the web and find more and more detailed information about who does what, and with a little searching - some how-to photos to support their processes.
 Being a romantic, I was totally swooned over by the Mulleavy sisters’ “
 Seventies suburban Californian, the Redwood forest, Big Sur and the rugged Bay area inspiration for the collection has been well documented, but actually, how and why it happened has no significance for me. I was drawn in by the fantasy of feeling closer to nature. The hand carved barrettes, in raw chunky wood become so beautiful with the shapes of butterflies, beetles and branches. They stimulate and intertwine with one’s own colorful associations and imagination of nature with the interpretation and softness of this artist's hand carved image.
  These feelings are carried over into the hair, make-up, shoes and belts.
  And even though I love the clothes, my style would be to wear all their accessories with my own jeans, cashmere and silk, with more streamlined and wrapped dresses, allowing them to glow with the touch of sun and moonlight and no competition and truly become a part of my life, and feel I am in the forest, even though I am in the city. Uhmmm… .